
Cold room condensing unit plays a key role in cold storage performance.
It helps keep the right temperature for products such as vegetables, fruit, seafood, ice cream, and medicines. If you choose the wrong unit, the cold room may cool slowly, consume more power, or face frequent problems.
Who This Guide is For
This guide suits cold room wholesalers, installers, project contractors, and businesses that need their own refrigeration systems.
It explains what a cold room condensing unit is, how its main components work, how to install and commission it.
It also helps readers understand key operating points and the market trend of refrigerant replacement, so they can make better technical and purchasing decisions.
Condensing Unit Selection Criteria
When you choose a condensing unit, don’t look at COLD ROOM SIZE ONLY. Room size is just the starting point.
You also need to think about your target room temperature, insulation quality, door opening frequency, and how often products move in and out.
If you choose a unit by room volume only, the process may look easy at first. But in summer, in hot areas, or in heavy-use projects, you may face slow cooling, higher power bills, or long hours of heavy compressor operation.
1. What should you check first?
Focus on these 3 key factors:
- Cold room size: It shows the rough cooling capacity you need.
- Insulation performance: Poor insulation causes faster cooling loss, so you need a larger unit.
- Target temperature: The lower the temperature, the harder the unit needs to work.
Simple words: A larger room, poorer insulation, or a lower target temperature usually needs a larger condensing unit.
2. Why can’t you choose by room size only?
Because two cold rooms with the same size may need very different units!
For example, one 100 m³ cold room may store drinks, open the door less, and use good insulation.
Another 100 m³ room may store frozen meat, open the door many times a day, and receive warmer products.
Even if the room size stays the same, the 2nd one needs more cooling capacity and usually needs a larger unit.
3. How do you choose different horsepower ranges?
- 1–3HP: Good for small cold rooms, small kitchen cold rooms, drinks, or flower storage.
- 3–8HP: Good for medium cold rooms, food delivery, and small food processing projects.
- Above 8HP: Good for medium and large freezer rooms, meat and seafood storage, or high-turnover projects.
Note: HP is only a reference. You still need to check whether the unit can handle your cold room under real working conditions.

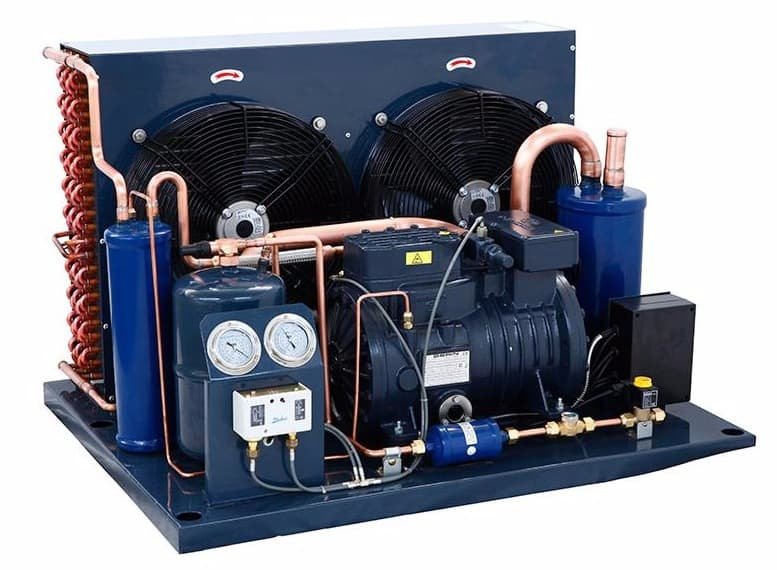
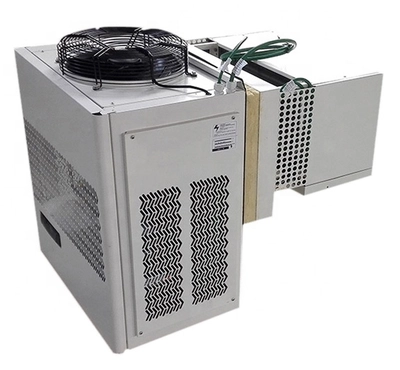
Semi-hermetic Condensing Unit
Energy Efficiency and COP
Many buyers look at price first and horsepower second, but energy efficiency affects long-term cost more directly.
If two units can provide the same cooling result, the more efficient one usually saves more electricity over time.
1. What is COP?
You can understand COP in a simple way:
It shows how much cooling the unit can produce from one unit of electricity.
The higher the COP, the more energy the unit can save.
- A higher COP means better energy efficiency.
- A COP >3.0 usually shows good energy-saving performance.
When you compare units, don’t ask only about HP. Ask about COP too.
2. What is EER?
EER is similar to COP. It also shows energy efficiency.
Note: A higher EER usually means the unit can save more electricity. EER = COP × 3.412
3. Why do more buyers care about inverter compressors?
Inverter compressor doesn’t run at full speed all the time. When the cooling load drops, it can adjust COMPRESSOR FREQUENCY automatically. This usually helps the unit save more energy and run more smoothly than a non-inverter unit.
4. What other energy-saving points should buyers check?
-
High ambient performance: Check whether the unit loses too much performance in summer or tropical climates.
-
Actual cooling capacity under real conditions: Check whether the unit can handle your real project, not just the rated data on paper.
Functions of Condensing Unit Components
Compressor
It plays the role of compressing and driving the refrigerant in the refrigerant circuit. Compressor extracts the refrigerant from the low-pressure area and compresses it, then delivers to the high-pressure area for cooling and condensation.
It emits heat into the air through the air-cooling fins, meanwhile, the refrigerant also changes from gaseous to liquid state, and finally the pressure rises.

Compressor
Condenser
It’s one of the main heat exchange equipment in the Refrigeration system of the cold storage, used to cool the high-temperature refrigerant vapor discharged from the compressor of the cold storage, or condense it into a high-pressure liquid.

Condenser
Solenoid Valve
1. Prevent the high-pressure refrigerant liquid from entering the evaporator when the compressor is shut down, avoid the low pressure from being too high when the compressor is running next time, meanwhile prevent the compressor from liquid strike.
2. When the temperature of cold storage reaches the set value, the thermostat starts working, while the solenoid valve loses power, and the compressor stops when the low pressure reaches the set value of shutdown.
When the temperature in the cold room rises back to the set value, the thermostat works, and the solenoid valve works also. The compressor starts when the low pressure rises to the compressor set value.
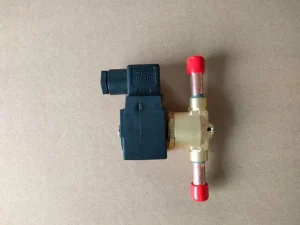
Solenoid Valve
High and Low Voltage Protector
Prevent high pressure from being too high and low pressure too low, to protect the compressor.

High and Low Voltage Protector
Thermostat
Equivalent to the brain of the cold storage, which controls the opening and stopping of refrigeration, defrosting, and the opening and stopping of fans.

Thermostat
Filter Drier
Filtration of impurities and moisture in the system.

Filter Drier
Oil Pressure Protector
Make sure the compressor has enough lubricating oil.

Oil Pressure Protector
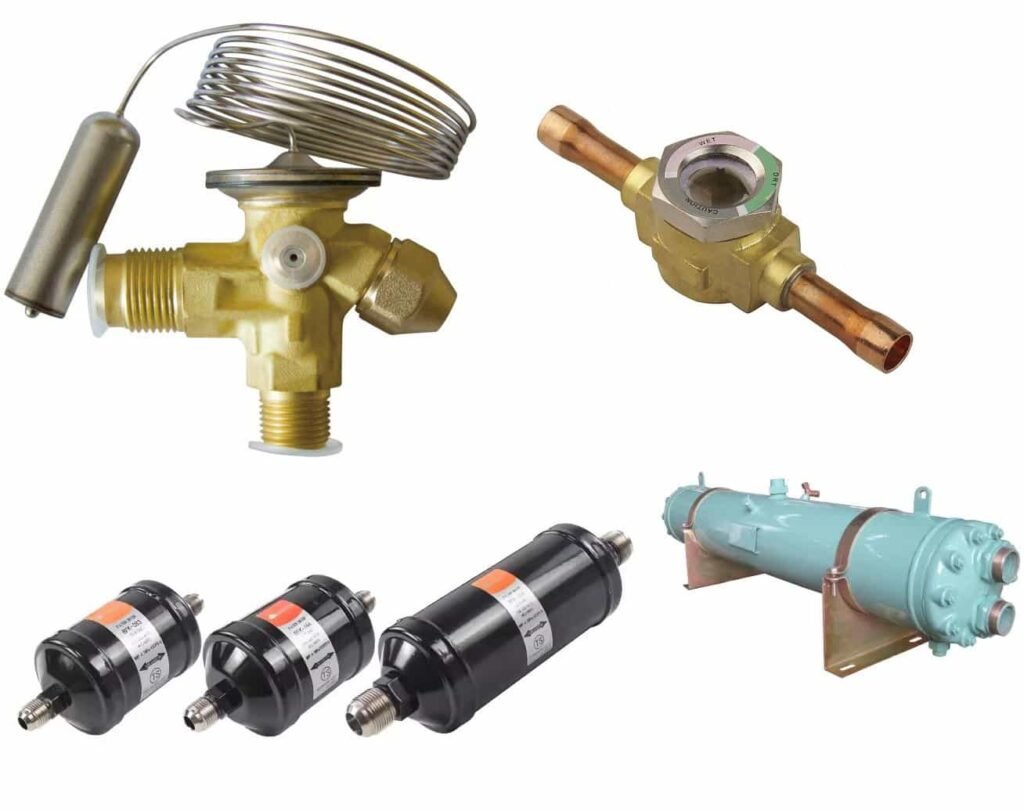
Thermal Expansion Valve
Also called “throttle valve”, which can make the high and low pressure of the system form a huge pressure difference, so that the high-pressure refrigerant liquid at the outlet of the expansion valve quickly expands and evaporates, absorbs the heat in the air through the tube wall, and exchanges cold and heat.
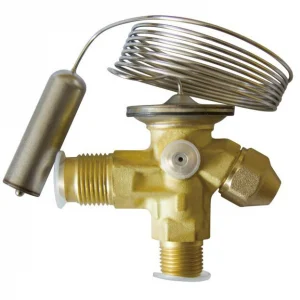
Thermostatic Expansion Valve (TXV)
How TXV works
Notice: If you want to know more knowledge about TXV, please cheeck our post “Thermal Expansion Valve Function and Debug“.
Oil Separator
Separating the lubricating oil in the high-pressure steam (discharged from the refrigeration compressor) to ensure the safe and efficient operation of the device.
According to the principle of oil separation by reducing the airflow speed and changing the airflow direction, the oil particles in the high-pressure steam are separated under the action of gravity.
Generally, when the air velocity is below 1m/s, can separate the oil particles >0.2mm diameter (contained in the steam).

Oil Separator
Evaporator Pressure Regulating Valve
Prevent the evaporator pressure (and evaporation temperature) from falling below the specified value. Sometimes adjust the evaporator pressure to adapt the load change.

Evaporator Pressure Regulating Valve
Fan Governor
Mainly used for the speed regulation of the outdoor air-cooled condenser fan motor, or the cold room evaporator.

Fan Governor
Gas-liquid Separator
To separate the refrigerant in the vapor-liquid mixed state (returned by the evaporator), thereby preventing the compressor liquid strike.

Gas-liquid Separator
Sight Glass
To observe the flow of the refrigerant. When the refrigerant is in an appropriate amount, only liquid will flow without producing white bubbles; if the system is dry, the sight core is green, otherwise it may become yellow or other colors.

Sight Glass
Cold Room Unit Installation and Commissioning
Unit Cooler Installation Tips
1. Find the best installation location
1st, you should consider the best location for air circulation to install the Unit cooler (also called evaporator unit), 2nd, consider the direction of the cold room structure.

Unit Cooler Circuit Diagram
The gap between unit cooler and cold room inside wall should be larger than evaporator thickness.
2. Tighten all slings
Tighten all the evaporator slings when installation, meanwhile perforate and seal the bolts & slings with sealant to prevent air leakage.
When the evaporator is too heavy, you should use the No. 4 or 5 angle iron as the beam, and remember spanning the lintel to another top plate and wall plate in-order-to reduce the load-bearing.

Unit Cooler Installation
3. Installation direction
For more information about the direction of unit cooler installation, please check the “Unit Cooler” knowledge page.
Cold Room Condensing Unit Installation Tips
1. Equip with oil separator
Both semi-hermetic and enclosed compressors should equip with an oil separator, and fill an appropriate amount of oil.
When the evaporation temperature is lower than -15°C, you should install a gas-liquid separator with appropriate amount of refrigeration oil.
2. Install rubber seat onto compressor base
Should install a shock-absorbing rubber seat onto the compressor base, remember to reserve the maintenance space when installing the condensing unit, which is convenient to observe instruments and adjust valves.
3. Select right copper pipe diameter
Depend on the size of suction and discharge valve interfaces of the compressor to select the copper pipe diameter.
You should increase the pipe diameter when the separation between the condenser and the compressor exceeds 3 meters. What’s more, keep >400mm distance between the suction side of the condensing unit and the wall, and keep at least 3 meters between the air outlet and obstacles.
4. Follow the nameplate
The pipe diameter of the liquid storage tank is based on the exhaust and liquid outlet pipe diameters which are indicated on the nameplate.
The suction pipeline of the compressor and the return pipeline of the evaporator shouldn’t be smaller than the size indicated on the nameplate, in order to reduce the internal resistance of the evaporation pipeline.

Inverter Condensing Unit Nameplate
5. Pipes need inclination
The exhaust pipe and return pipe should have a certain inclination.
When the condenser position is higher than the compressor, the exhaust pipe must lean towards the condenser and install a liquid ring at the exhaust vent of the compressor, which can prevent the gas (from cooling and liquefying after shutdown) backflow to the high-pressure exhaust vent, and causing liquid compression when the machine restarted.
6. Install a U-shaped bend
You should install a U-shaped bend at the evaporator outlet of the air return pipe, and the air return line should incline toward the compressor to ensure smooth oil return.

Notice:
- Should install the expansion valve as close as possible to the evaporator!
- Install the solenoid valve horizontally, the valve body vertically, meanwhile pay attention to the direction of liquid discharge.
- Fasten the expansion valve temperature sensor with metal buckles at 100~200mm from the evaporator outlet, and wrap it with double-layer insulation.
Refrigerant Filling and Refrigeration System Commissioning
Some tips as follow:
1. Measure the power supply
Measure the resistance of the compressor and the insulation of the motor.
2. Fill refrigerant
After vacuum, fill refrigerant into the liquid storage tank roughly 70-80% of the standard filling volume and then run the compressor at low pressure to fill the refrigerant into standard volume, finally set the temperature and opening state of the expansion valve according to the frosting and the cold storage condition.
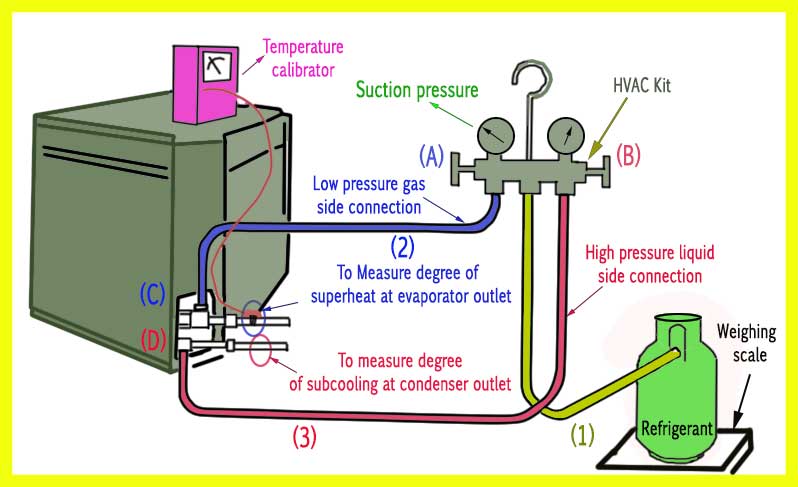
Fill Refrigerant into the Cooling System
3. Pay attention to abnormal sounds
After starting the machine, first listen to whether the compressor sound is normal, check whether the condenser and evaporator are running normally and whether the compressor current is stable.
After stable cooling, check the refrigeration system all parts performance: exhaust pressure, suction pressure, exhaust temperature, suction temperature, motor temperature, crankcase temperature, expansion valve temperature, observe the frosting of the evaporator & expansion valve, and observe the oil level and if the equipment’ sound is abnormal.
4. Clean refrigeration system
The inside of the refrigeration system must be very clean, otherwise it will block the throttle holes and the lubricating oil paths.
- For ammonia system: Usually use refrigeration compressor to boost the system air, and rapidly flush out the air at the lowest level of each main container (such as condenser, evaporator, liquid storage tank), so that the garbage is discharged from the system.
- For freon refrigeration systems: Usually use nitrogen for blowdown, to prevent moisture in the air from entering the system.
Notice: If you want to know more about the refrigeration system cleaning, please check our POST “How to Remove Air Inside the Refrigeration System?”
Test Run Attention
Check the system in this order: external conditions, electrical system, compressor, refrigeration system, and safety protection devices.
To help installers during on-site commissioning, use the following cold room condensing unit test run checklist to check each item one by one.
| Check Item | What to Check | Standard / Requirement | Risk |
|---|---|---|---|
| Valve status | Check whether all valves stay in the correct open position, especially the discharge shut-off valve. | Open all valves correctly before test run. Don't close the discharge shut-off valve. | A closed discharge valve may cause high head pressure and may damage the compressor. |
| Condenser operating conditions | For water-cooled systems, check whether the cooling water valve stays open. For air-cooled systems, check whether the fan runs and whether airflow direction is correct. | Cooling water flow or air volume must meet unit requirements. | Poor heat rejection may raise condensing pressure and reduce cooling performance. |
| Electrical control | Test the electrical control circuit separately. Check whether the power supply voltage stays normal. | The control circuit should work properly. The voltage should stay stable and match unit requirements. | Voltage problems or control failure may prevent startup or trigger false protection. |
| Compressor oil level | Check the oil level in the compressor crankcase. | Keep the oil level near the center line of the sight glass. | Low oil level may cause poor lubrication and shorten compressor life. |
| High and low pressure gauges | Check whether the high-side and low-side pressure readings stay within the normal operating range. | Pressure readings should match normal unit operating conditions. | Abnormal pressure may indicate blockage, low refrigerant charge, overcharge, or poor heat rejection. |
| Oil pressure | Check whether the oil pressure reading stays normal. | For compressors with capacity control, oil pressure should stay 0.15–0.3 MPa above suction pressure. For compressors without capacity control, oil pressure should stay 0.05–0.15 MPa above suction pressure. | Low oil pressure may cause lubrication failure and increase compressor failure risk. |
| Expansion valve operation | Listen for refrigerant flow through the expansion valve and check the line condition. | You should hear normal flow. In cold room systems, the line should show normal frosting. | No flow sound or abnormal frosting may indicate blockage, poor liquid supply, or valve failure. |
| Capacity control compressor | For compressors with an unloading device, check whether the compressor starts at full load. | The compressor should run at full load during initial startup. Check cylinder head temperature to confirm operation. | If some cylinders don't work, cooling capacity may drop. |
| Cylinder head temperature | Touch each cylinder head and compare the temperature. | A hotter cylinder head usually means the cylinder works normally. A cooler cylinder head may mean the cylinder doesn't work. | A non-working cylinder may cause low output or unstable operation. |
| Safety protection devices | Check the high and low pressure relay, oil differential pressure relay, cooling water cut-off relay, freeze protection device, safety valve, and other protection devices one by one. | All protection devices should work normally and use proper settings. | Protection failure may increase system accident risk. |
| Instrument readings | Check whether other instrument readings stay within the specified range. | All readings should stay stable without obvious fluctuation. | Abnormal readings may indicate hidden system problems. |
| Abnormal condition handling | Watch for abnormal noise, pressure, temperature, or other unusual conditions during test run. | Stop the unit first, then find the cause. | Continued operation may make the problem worse. |
| Common fault inspection | Focus on common faults such as expansion valve blockage and filter drier blockage. | If the system runs unstably, check these common fault points first. | Blockage may cause poor liquid supply, abnormal pressure, and weak cooling. |
| System cleanliness and dryness | Confirm the system inside stays clean and dry without dirt or moisture. | Keep the system clean and dry before installation and commissioning. | Dirt and moisture may cause ice blockage, dirt blockage, and poor lubrication. |
Notice: If you find abnormal high pressure, low oil pressure, unusual noise, or frequent safety trips, stop the unit at once and inspect the system. Don’t force it to keep running.
Cold Room Unit Common Issues
During cold room unit operation, common issues may include high-pressure alarms, low-pressure faults, oil pressure problems, compressor startup failure, and expansion valve icing.
For a full troubleshooting guide, please read our detailed post “Cold Room Faults List and Troubleshootings Ultimate Guide”.
R404A Replacement Trend
R404A still serves many existing cold room systems, but it no longer stands out as a long-term choice for new projects.
Its high GWP brings more compliance pressure, tighter supply risk, and less predictable maintenance costs.
For wholesalers, installers, EPC contractors, and end users, refrigerant choice now affects not only system design but also operating cost and long-term market fit.
Market Trend
More cold room projects now reduce their reliance on R404A. In new installations, buyers increasingly prefer lower-GWP refrigerants that offer better long-term value.
This means that if a new project still uses R404A today, the upfront purchase may seem more straightforward, but future refrigerant refill, service, and compliance costs may rise.
Main Replacement Direction
From today’s market trend, R290 deserves more attention as a replacement option.
Compared with R404A, R290 offers an ultra-low GWP and stronger advantages in environmental compliance and long-term development.
For suppliers and contractors who want to improve product competitiveness, reduce future policy risk, and strengthen project value, R290 continues to gain appeal.
However, R290 requires more than a simple refrigerant change. It demands higher standards in system design, safety rules, application planning, and installation and service capability.
Because of that, a mature R290 cold room unit solution now shows a manufacturer’s technical strength and upgrade capability.

Commercial Impact
From a business perspective, the R404A replacement trend directly affects new project configuration, product positioning, after-sales strategy, and long-term market competitiveness.
When customers choose a cold room condensing unit, they no longer focus only on unit price.
They also consider whether the refrigerant matches future market trends, whether service stays convenient, and whether the project can keep its value in the years ahead.
FAQs
Q1: How do I buy cold room condensing units from a Chinese manufacturer?
1. Confirm room temperature, room size, refrigerant, power supply, and ambient temperature first.
2. If you need OEM service, confirm logo, carton, nameplate, manuals, and controller language early.
3. Ask about MOQ, lead time, spare parts, and after-sales support before ordering.
4. Before shipment, check the compressor brand, nameplate data, refrigerant, pipe sizes, electrical setup, and wiring diagram.
5. For better safety, confirm specs first, documents second, inspection standard third, and final payment last.
Q2: What should I pay attention to when I choose a condensing unit for different climates or regions?
1. For hot regions, check whether the unit supports high ambient temperatures such as 46°C, 50°C, or 52°C.
2. Pay attention to condenser size, fan performance, compressor match, and high ambient kit options.
3. For coastal or humid areas, check corrosion protection, cabinet material, and electrical box sealing.
4. For dusty areas, check airflow design and cleaning convenience.
5. A unit that matches local climate usually runs more reliably and lasts longer.
Q3: What should I pay most attention to if I install the condensing unit outdoors?
First, check ventilation. Then check sun protection, rain protection, and service space.
If air can’t move well around the condenser, the unit may still face high condensing pressure, lower cooling performance, and frequent summer alarms even if the configuration is correct.

Q4: Will unstable voltage affect condensing unit operation?
Yes, and the impact can be bigger than many buyers expect.
Voltage fluctuation can affect compressor startup, contactor action, fan operation, and control system stability. In serious cases, it can also cause false safety trips or shorten the life of electrical parts.
If your local power supply is unstable, confirm the unit’s voltage and frequency range before you buy.
You should also check whether you need voltage stabilization, phase sequence protector, phase loss protection, or a higher-level electrical control system.
Q5: What do buyers most often overlook when they inspect the unit after it’s on site?
Many buyers only check whether the outside looks damaged, but small details often cause bigger problems later.
When the unit arrives, don’t check the appearance only. Also check the nameplate data, compressor brand and model, refrigerant type, pipe connection sizes, fan quantity, power supply specification, control box configuration, and whether the shipment includes the wiring diagram and wire markings.
Conclusion
Cold room condensing unit affects cooling performance, energy use, and system reliability.
The right unit can support stable operation, lower running costs, and fewer service problems.
If you understand the key components, selection points, installation basics, and common issues, you can make better decisions for your cold room project.


2 Responses
The literature is so amazing, it is so good to learn from it.
But I suggest you could had included the installation diagram and circuit diagram.
OK, thanks for the suggestion.