
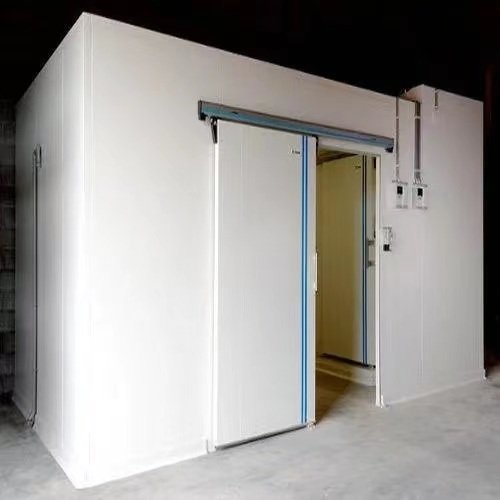
Die Kühlraum-Kondensationseinheit spielt eine Schlüsselrolle für die Leistung der Kühllagerung.
Es hilft, die richtige Temperatur für Produkte wie Gemüse aufrechtzuerhalten, Frucht, Meeresfrüchte, Eiscreme, und Medikamente. Wenn Sie die falsche Einheit wählen, Der Kühlraum kann langsam abkühlen, verbrauchen mehr Strom, oder häufige Probleme haben.
Für wen dieser Leitfaden gedacht ist
This guide suits kalter Raum wholesalers, Installateure, Projektauftragnehmer, und Unternehmen, die ihre eigenen Kühlsysteme benötigen.
It explains what a cold room Verflüssigungseinheit Ist, wie seine Hauptkomponenten funktionieren, wie man es installiert und in Betrieb nimmt.
Außerdem hilft es den Lesern, wichtige Betriebspunkte und den Markttrend beim Kältemittelaustausch zu verstehen, So können sie bessere technische Entscheidungen und Kaufentscheidungen treffen.
Auswahlkriterien für Verflüssigungssätze
Wenn Sie sich für eine Kondensationseinheit entscheiden, Achten Sie nicht nur auf die Größe des Kühlraums. Die Raumgröße ist nur der Ausgangspunkt.
Sie müssen auch über Ihre angestrebte Raumtemperatur nachdenken, Isolationsqualität, Türöffnungsfrequenz, und wie oft Produkte ein- und ausgehen.
Wenn Sie eine Einheit nur nach Raumvolumen wählen, Der Vorgang mag auf den ersten Blick einfach erscheinen. Aber im Sommer, in heißen Gegenden, oder bei stark beanspruchten Projekten, Es kann zu einer langsamen Abkühlung kommen, höhere Stromrechnungen, oder stundenlanger intensiver Kompressorbetrieb.
1. Was sollten Sie zuerst prüfen??
Konzentrieren Sie sich auf diese 3 Schlüsselfaktoren:
- Kühlraumgröße: Es zeigt die ungefähre Kühlleistung an, die Sie benötigen.
- Isolationsleistung: Eine schlechte Isolierung führt zu einem schnelleren Kühlverlust, Sie benötigen also eine größere Einheit.
- Zieltemperatur: Je niedriger die Temperatur, desto stärker muss das Gerät arbeiten.
Einfache Worte: Ein größerer Raum, schlechtere Isolierung, oder eine niedrigere Zieltemperatur erfordert normalerweise eine größere Kondensationseinheit.
2. Warum können Sie nicht nur nach Zimmergröße auswählen??
Because two Kühlräume with the same size may need very different units!
Zum Beispiel, eins 100 In einem m³ Kühlraum können Getränke gelagert werden, Öffnen Sie die Tür weniger, und verwenden Sie eine gute Isolierung.
Ein anderer 100 m³ Raum kann gefrorenes Fleisch lagern, Öffne die Tür mehrmals am Tag, und wärmere Produkte erhalten.
Auch wenn die Raumgröße gleich bleibt, der zweite benötigt mehr Kühlleistung und benötigt in der Regel ein größeres Gerät.
3. Wie wählt man verschiedene PS-Bereiche aus??
- 1-3 PS: Gut für kleine Kühlräume, kleine Küche, Kühlräume, Getränke, oder Blumenaufbewahrung.
- 3–8 PS: Gut für mittelkalte Räume, Essenslieferung, und kleine Lebensmittelverarbeitungsprojekte.
- Über 8 PS: Gut für mittlere und große Gefrierräume, Lagerung von Fleisch und Meeresfrüchten, oder umsatzstarke Projekte.
Notiz: HP ist nur eine Referenz. Sie müssen noch prüfen, ob das Gerät unter realen Arbeitsbedingungen mit Ihrem Kühlraum zurechtkommt.
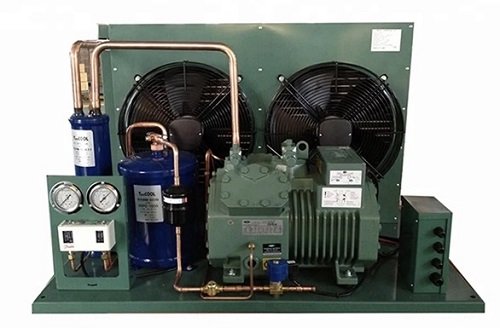
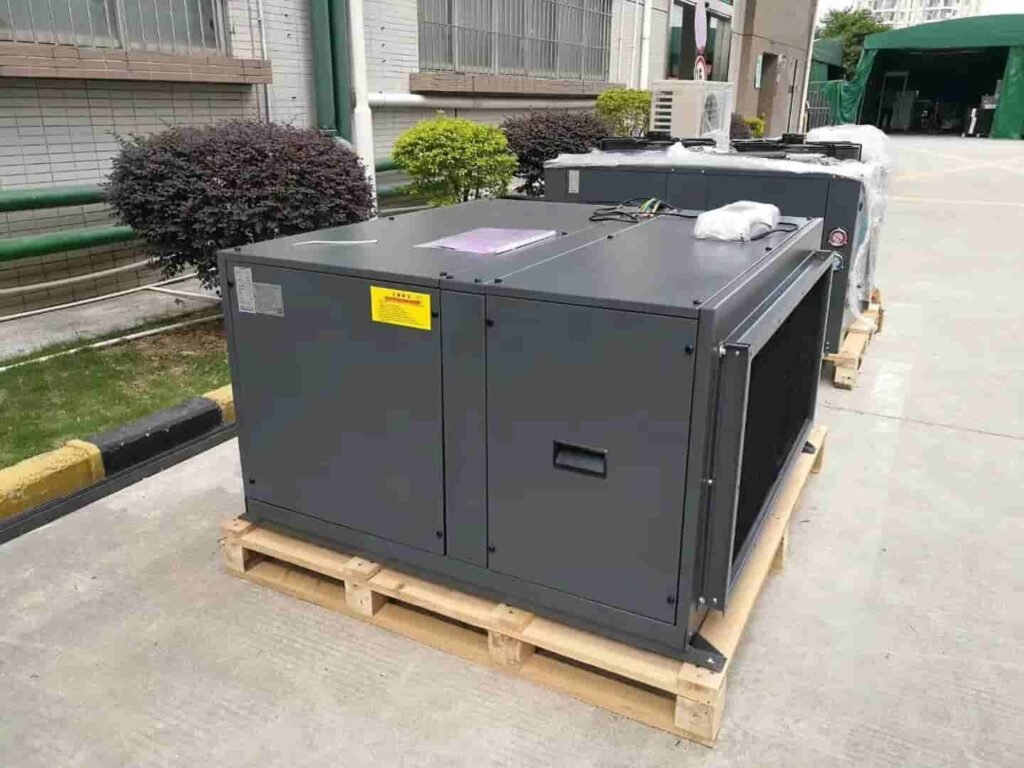
Halbhermetische Verflüssigereinheit
Energieeffizienz und COP
Viele Käufer achten zuerst auf den Preis und dann auf die Leistung, Die Energieeffizienz wirkt sich jedoch direkter auf die langfristigen Kosten aus.
Wenn zwei Geräte das gleiche Kühlergebnis liefern können, Die effizientere Variante spart im Laufe der Zeit normalerweise mehr Strom.
1. Was ist COP??
Sie können COP auf einfache Weise verstehen:
Es zeigt an, wie viel Kälte das Gerät aus einer Stromeinheit erzeugen kann.
Je höher der COP, desto mehr Energie kann das Gerät sparen.
- Ein höherer COP bedeutet eine bessere Energieeffizienz.
- Ein COP >3,0 zeigt normalerweise eine gute Energiesparleistung an.
Wenn Sie Einheiten vergleichen, Fragen Sie nicht nur nach HP. Fragen Sie auch nach COP.
2. Was ist EER??
EER ähnelt COP. Es zeigt auch die Energieeffizienz.
Notiz: Ein höherer EER bedeutet normalerweise, dass das Gerät mehr Strom sparen kann. EER = COP × 3.412
3. Warum interessieren sich immer mehr Käufer für Inverterkompressoren??
Der Inverter-Kompressor läuft nicht immer mit voller Geschwindigkeit. Wenn die Kühllast sinkt, Es kann die KOMPRESSORFREQUENZ automatisch anpassen. Dies trägt normalerweise dazu bei, dass das Gerät mehr Energie spart und reibungsloser läuft als ein Gerät ohne Wechselrichter.
4. Welche weiteren Energiesparpunkte sollten Käufer prüfen??
-
Hohe Umgebungsleistung: Prüfen Sie, ob das Gerät im Sommer oder in tropischen Klimazonen zu stark an Leistung verliert.
-
Tatsächliche Kühlleistung unter realen Bedingungen: Prüfen Sie, ob das Gerät Ihr reales Projekt bewältigen kann, nicht nur die bewerteten Daten auf dem Papier.
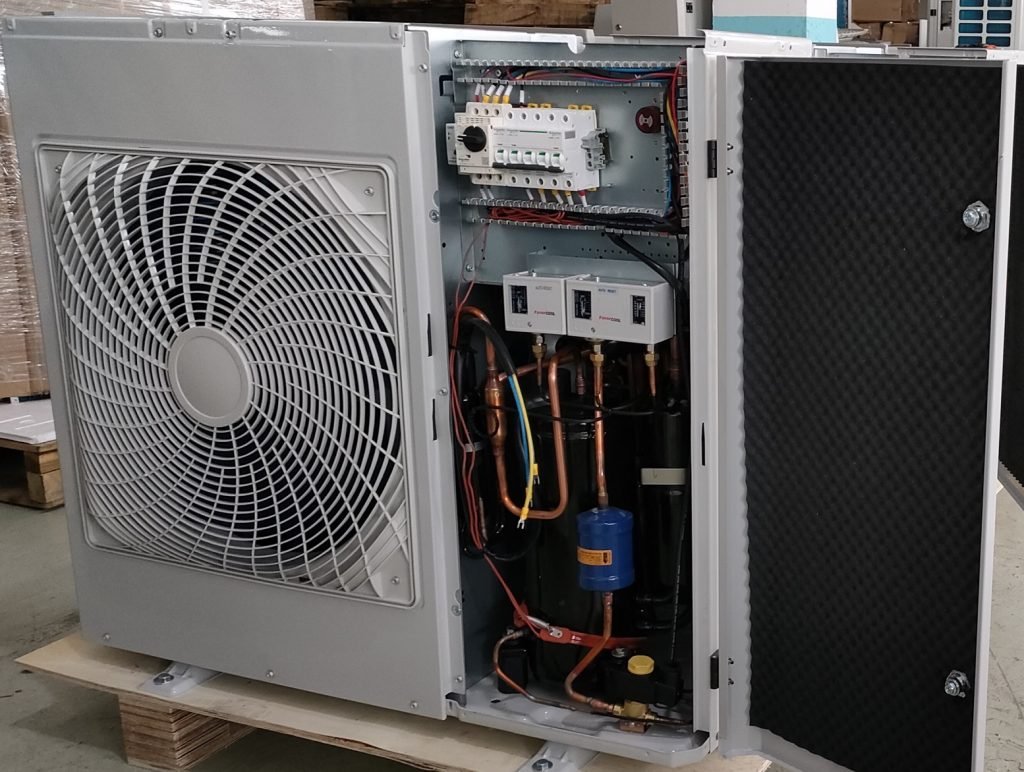
Funktionen der Komponenten der Verflüssigungseinheit
Kompressor
Es spielt die Rolle des Komprimierens und Antreibens des Kältemittels im Kältemittelkreislauf. Kompressor saugt das Kältemittel aus dem Niederdruckbereich an und verdichtet es, leitet dann in den Hochdruckbereich zur Kühlung und Kondensation.
Über die Luftkühllamellen gibt es Wärme an die Luft ab, in der Zwischenzeit, Auch das Kältemittel geht vom gasförmigen in den flüssigen Zustand über, und schließlich steigt der Druck.

Kompressor
Kondensator
Es ist eines der wichtigsten Wärmeaustauschgeräte im Kühlsystem des Kühllagers, verwendet, um den Hochtemperatur-Kältemitteldampf zu kühlen, der vom Kompressor des Kältespeichers abgegeben wird, oder es zu einer Hochdruckflüssigkeit kondensieren.

Kondensator
Magnetventil
1. Verhindern Sie, dass flüssiges Hochdruck-Kältemittel in den Verdampfer eindringt, wenn der Kompressor abgeschaltet ist, Vermeiden Sie, dass der Niederdruck zu hoch wird, wenn der Kompressor das nächste Mal läuft, verhindern Sie in der Zwischenzeit, dass der Kompressor mit Flüssigkeit schlägt.
2. Wenn die Temperatur des Kühlraums den eingestellten Wert erreicht, das Thermostat beginnt zu arbeiten, während das Magnetventil Strom verliert, und der Kompressor stoppt, wenn der Niederdruck den eingestellten Abschaltwert erreicht.
When the temperature in the kalter Raum rises back to the set value, das Thermostat funktioniert, und das Magnetventil funktioniert auch. Der Kompressor startet, wenn der Niederdruck auf den Kompressor-Sollwert ansteigt.
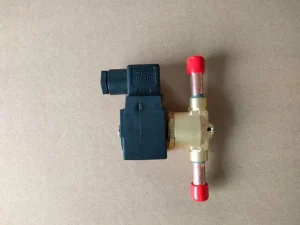
Magnetventil
Hoch- und Niederspannungsschutz
Vermeiden Sie, dass der Hochdruck zu hoch und der Niederdruck zu niedrig ist, zum Schutz des Kompressors.
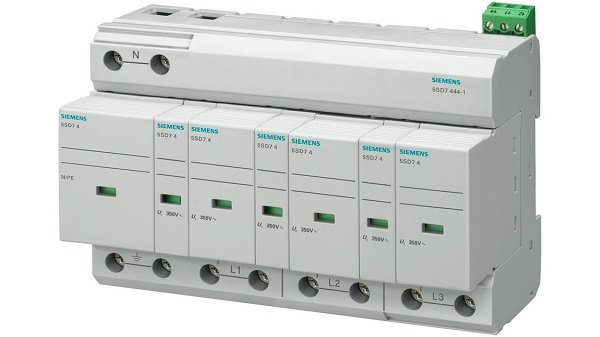
Hoch- und Niederspannungsschutz
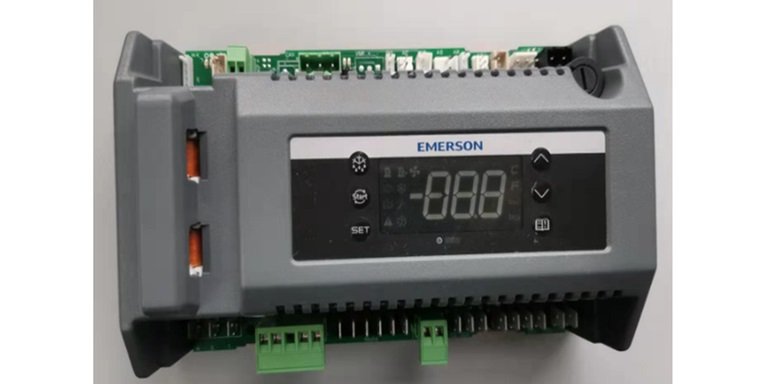
Thermostat
Entspricht dem Gehirn des Kühlhauses, die das Öffnen und Stoppen der Kühlung steuert, Auftauen, und das Öffnen und Stoppen von Ventilatoren.
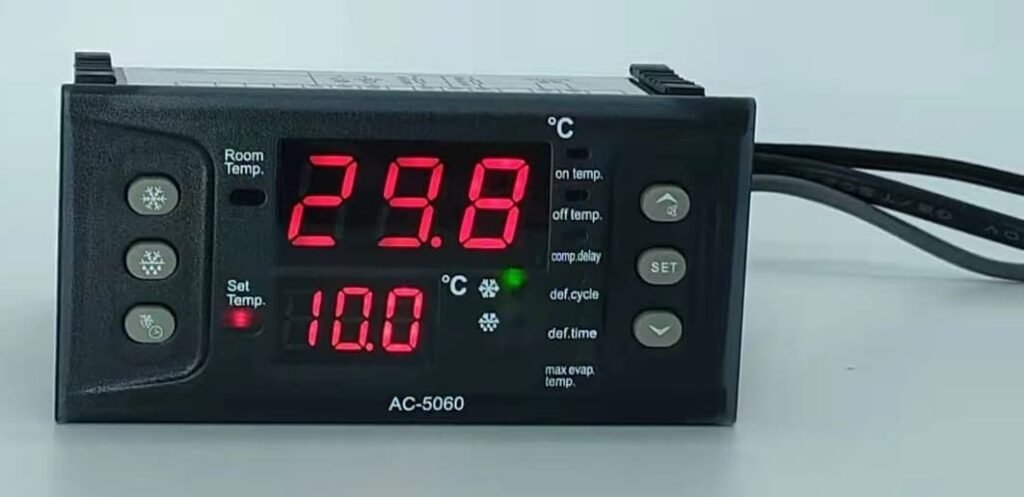
Thermostat
Filtertrockner
Filterung von Verunreinigungen und Feuchtigkeit im System.

Filtertrockner
Öldruckschutz
Stellen Sie sicher, dass der Kompressor genügend Schmieröl hat.
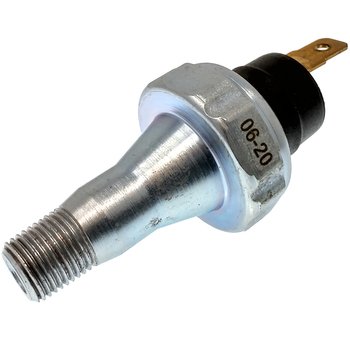
Öldruckschutz
Thermisches Expansionsventil
Auch genannt „Drosselklappe“, wodurch der Hoch- und Niederdruck des Systems einen enormen Druckunterschied bilden können, so dass die Hochdruck-Kältemittelflüssigkeit am Auslass des Expansionsventils schnell expandiert und verdampft, nimmt die Wärme der Luft durch die Rohrwand auf, und tauscht Kälte und Wärme aus.
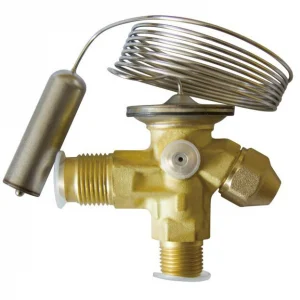
Thermostatisches Expansionsventil (TXV)
So funktioniert TXV
Notiz: Wenn Sie mehr über TXV erfahren möchten, Bitte schauen Sie sich unseren Beitrag an „Funktion und Fehlerbehebung des thermischen Expansionsventils„.
Ölabscheider
Trennen des Schmieröls im Hochdruckdampf (aus dem Kältekompressor abgelassen) um den sicheren und effizienten Betrieb des Geräts zu gewährleisten.
Nach dem Prinzip der Ölabscheidung durch Reduzierung der Luftstromgeschwindigkeit und Änderung der Luftstromrichtung, die ölpartikel im hochdruckdampf werden durch die einwirkung der schwerkraft abgeschieden.
Allgemein, wenn die Luftgeschwindigkeit unter 1m/s liegt, kann die Ölpartikel abscheiden >0.2mm Durchmesser (im Dampf enthalten).

Ölabscheider
Verdampferdruckregelventil
Verhindern Sie den Verdampferdruck (und Verdampfungstemperatur) den angegebenen Wert nicht unterschreiten. Passen Sie manchmal den Verdampferdruck an, um den Lastwechsel anzupassen.
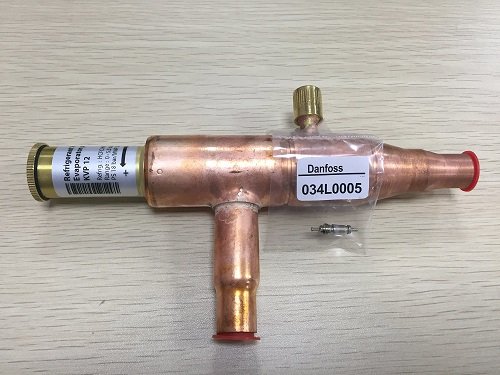
Verdampferdruckregelventil
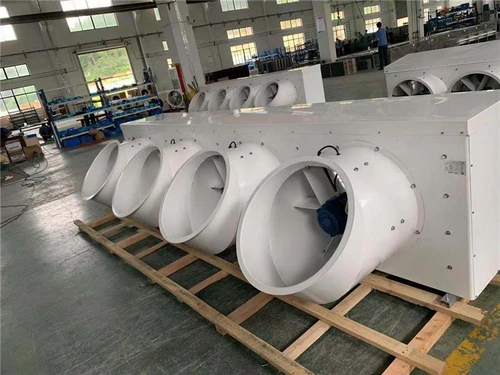
Fan-Governor
Wird hauptsächlich zur Drehzahlregelung des luftgekühlten Kondensatorventilatormotors im Außenbereich verwendet, oder der Kühlraumverdampfer.
Fan-Governor
Gas-Flüssigkeits-Abscheider
Um das Kältemittel im Dampf-Flüssigkeits-Mischzustand zu trennen (vom Verdampfer zurückgeführt), wodurch der Kompressorflüssigkeitsschlag verhindert wird.

Gas-Flüssigkeits-Abscheider
Schauglas
Um den Fluss des Kältemittels zu beobachten. Wenn das Kältemittel in einer angemessenen Menge vorhanden ist, Es fließt nur Flüssigkeit, ohne dass weiße Blasen entstehen; wenn das System trocken ist, der Sichtkern ist grün, andernfalls kann es gelb oder andersfarbig werden.
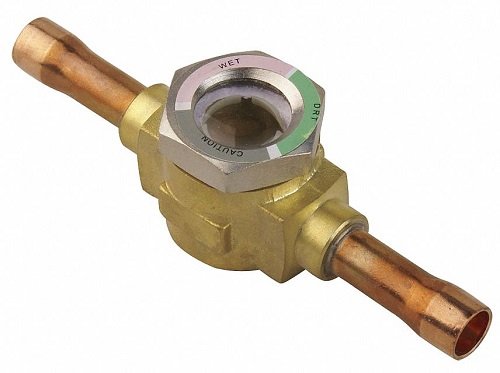
Schauglas
Installation und Inbetriebnahme der Kühlraumeinheit
Tipps zur Installation des Gerätekühlers
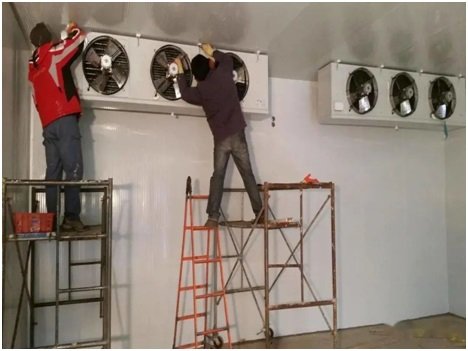
1. Finden Sie den besten Installationsort
1st, Sie sollten den besten Ort für die Luftzirkulation für die Installation des Gerätekühlers in Betracht ziehen (auch Verdampfereinheit genannt), 2nd, Berücksichtigen Sie die Richtung der Kühlraumstruktur.
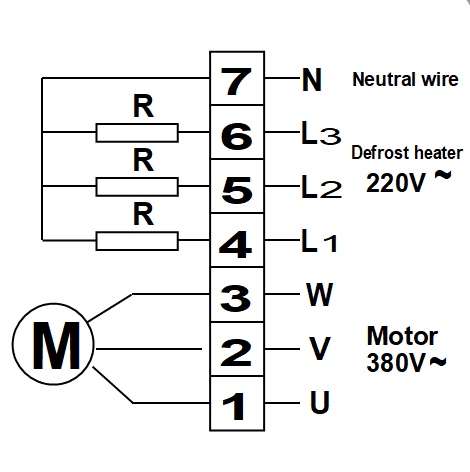
Schaltplan des Gerätekühlers
Der Spalt zwischen Gerätekühler und Kühlrauminnenwand sollte größer sein als die Dicke des Verdampfers.
2. Ziehen Sie alle Schlingen fest
Ziehen Sie bei der Installation alle Verdampferschlingen fest, In der Zwischenzeit perforieren und versiegeln Sie die Bolzen & Schlingen mit Dichtungsmittel, um Luftaustritt zu verhindern.
Wenn der Verdampfer zu schwer ist, Sie sollten die Nr. 4 oder 5 Winkeleisen als Balken, und denken Sie daran, den Sturz mit einer anderen oberen Platte und einer anderen Wandplatte zu überspannen, um die Tragfähigkeit zu verringern.
Installation des Einheitskühlers
3. Installationsrichtung
Weitere Informationen zur Installationsrichtung des Luftkühlers, Bitte überprüfen Sie die „Gerätekühler“ Wissensseite.
Installationstipps für Kühlraum-Kondensatoreinheiten
1. Mit Ölabscheider ausrüsten
Sowohl halbhermetische als auch geschlossene Kompressoren sollten mit einem Ölabscheider ausgestattet sein, und füllen Sie eine entsprechende Menge Öl ein.
Wenn die Verdampfungstemperatur unter -15 °C liegt, Sie sollten einen Gas-Flüssigkeitsabscheider mit einer angemessenen Menge Kälteöl installieren.
2. Installieren Sie den Gummisitz auf der Kompressorbasis
Sollte einen stoßdämpfenden Gummisitz auf der Kompressorbasis installieren, Denken Sie daran, bei der Installation des Wartungsraums Platz zu reservieren Verflüssigungseinheit, was bequem ist, um Instrumente zu beobachten und Ventile einzustellen.
3. Wählen Sie den richtigen Kupferrohrdurchmesser
Abhängig von der Größe der Saug- und Auslassventilschnittstellen des Kompressors wählen Sie den Kupferrohrdurchmesser.
Sie sollten den Rohrdurchmesser vergrößern, wenn der Abstand zwischen dem Kondensator und dem Kompressor überschritten wird 3 Meter. Was ist mehr, halten >400mm Abstand zwischen der Ansaugseite des Verflüssigungssatzes und der Wand, und mindestens halten 3 Meter zwischen dem Luftauslass und Hindernissen.
4. Folgen Sie dem Typenschild
Der Rohrdurchmesser des Flüssigkeitsspeichers richtet sich nach den auf dem Typenschild angegebenen Abgas- und Flüssigkeitsauslassrohrdurchmessern.
Die Saugleitung des Kompressors und die Rücklaufleitung des Verdampfers sollten nicht kleiner sein als auf dem Typenschild angegeben, um den Innenwiderstand der Verdampfungsleitung zu reduzieren.
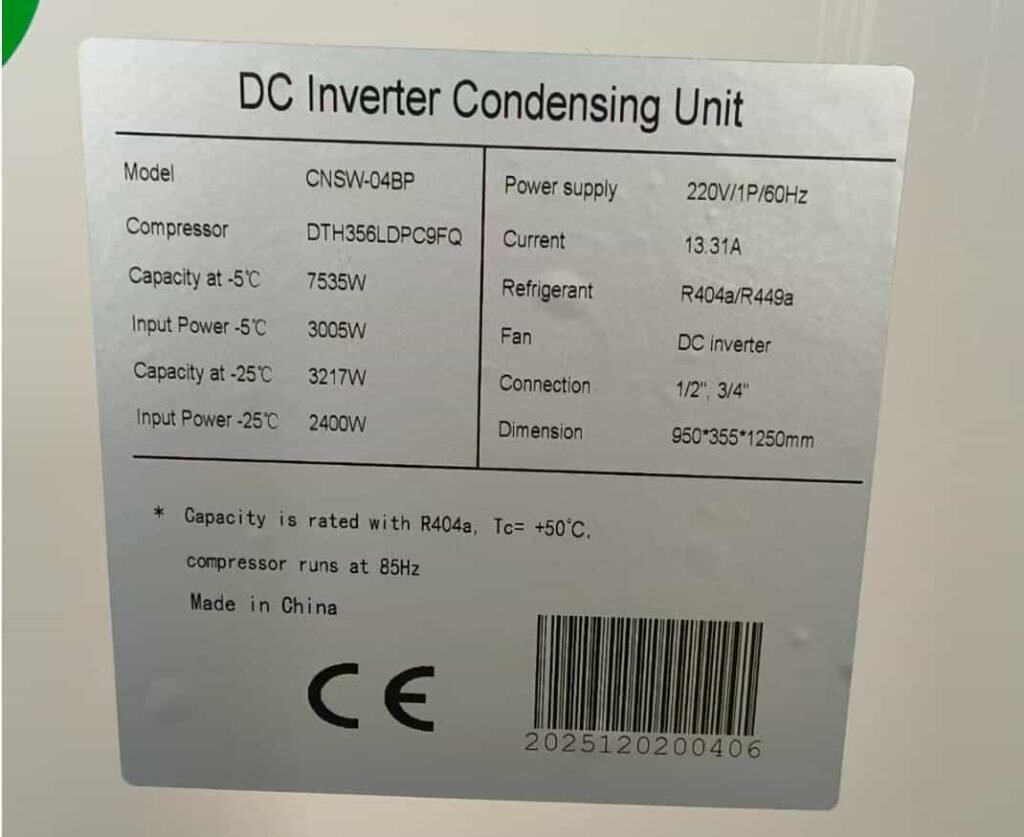
Typenschild der Inverter-Kondensatoreinheit
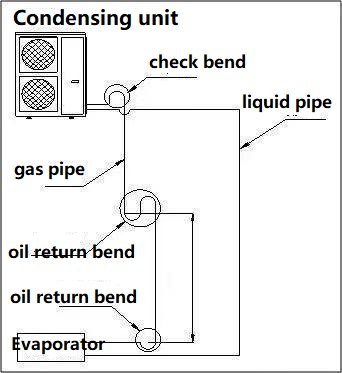
5. Rohre brauchen Neigung
Abgasrohr und Rücklaufrohr sollten eine gewisse Neigung haben.
Wenn die Kondensatorposition höher ist als der Kompressor, Das Auspuffrohr muss zum Kondensator geneigt sein und einen Flüssigkeitsring an der Auslassöffnung des Kompressors installieren, die das Gas verhindern können (vor dem Abkühlen und Verflüssigen nach dem Abschalten) Rückfluss zum Hochdruckauslass, und Verursachen einer Flüssigkeitskompression, wenn die Maschine neu gestartet wird.
6. Installieren Sie einen U-förmigen Bogen
Am Verdampferausgang des Luftrückführungsrohrs sollten Sie einen U-förmigen Bogen einbauen, und die Luftrückführungsleitung sollte zum Kompressor hin geneigt sein, um eine reibungslose Ölrückführung zu gewährleisten.
Notiz:
- Das Expansionsventil sollte so nah wie möglich am Verdampfer installiert werden!
- Bauen Sie das Magnetventil horizontal ein, den Ventilkörper senkrecht, Achten Sie dabei auf die Richtung des Flüssigkeitsaustritts.
- Befestigen Sie den Temperatursensor des Expansionsventils mit Metallschnallen in einem Abstand von 100 bis 200 mm vom Verdampferauslass, und wickeln Sie es mit doppellagiger Isolierung ein.
Kältemittelbefüllung und Inbetriebnahme der Kälteanlage
Nachfolgend einige Tipps:
1. Messen Sie die Stromversorgung
Messen Sie den Widerstand des Kompressors und die Isolierung des Motors.
2. Kältemittel einfüllen
Nach Vakuum, Kältemittel grob in den Flüssigkeitsvorratsbehälter füllen 70-80% des Standardfüllvolumens und lassen Sie dann den Kompressor bei niedrigem Druck laufen, um das Kältemittel in das Standardvolumen zu füllen, Stellen Sie abschließend die Temperatur und den Öffnungszustand des Expansionsventils entsprechend der Frost- und Kältespeicherbedingung ein.
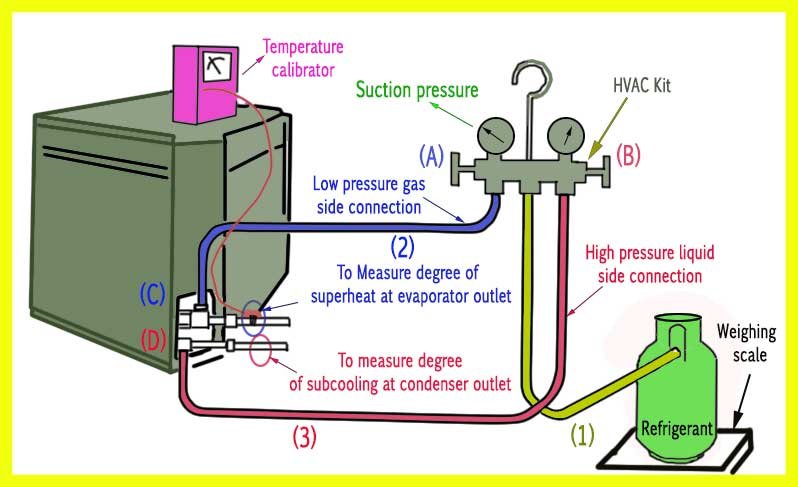
Füllen Sie Kältemittel in das Kühlsystem
3. Achten Sie auf anormale Geräusche
Nach dem Starten der Maschine, Hören Sie zuerst, ob das Kompressorgeräusch normal ist, Prüfen Sie, ob der Kondensator und der Verdampfer normal laufen und ob der Kompressorstrom stabil ist.
Nach stabiler Abkühlung, Überprüfen Sie die Leistung aller Teile des Kühlsystems: Abgasdruck, Saugdruck, Abgastemperatur, Ansaugtemperatur, Motortemperatur, Kurbelgehäusetemperatur, Temperatur des Expansionsventils, Bereifung des Verdampfers beobachten & Expansionsventil, und beobachten Sie den Ölstand und wenn die Ausrüstung‘ Ton ist anormal.
4. Kühlsystem reinigen
Das Innere des Kühlsystems muss sehr sauber sein, Andernfalls werden die Drosselbohrungen und die Schmierölwege blockiert.
- Für Ammoniaksystem: Verwenden Sie normalerweise einen Kältekompressor, um die Systemluft zu verstärken, und spülen Sie die Luft auf der untersten Ebene jedes Hauptbehälters schnell aus (wie Kondensator, Verdampfer, Flüssigkeitsspeicher), damit der Müll aus dem System entladen wird.
- Für Freon-Kühlsysteme: Verwenden Sie normalerweise Stickstoff zum Abblasen, um zu verhindern, dass Luftfeuchtigkeit in das System eindringt.
Notiz: Wenn Sie mehr über die Reinigung von Kühlsystemen erfahren möchten, Bitte schauen Sie sich unseren POST an „So entfernen Sie Luft aus dem Kühlsystem?“
Testlauf Achtung
Überprüfen Sie das System in dieser Reihenfolge: äußere Bedingungen, elektrisches System, Kompressor, Kühlsystem, und Sicherheitsschutzvorrichtungen.
Zur Unterstützung von Installateuren bei der Inbetriebnahme vor Ort, Verwenden Sie die folgende Testlauf-Checkliste für die Kühlraum-Kondensatoreinheit, um jeden Punkt einzeln zu überprüfen.
| Artikel prüfen | Was zu überprüfen ist | Standard / Erfordernis | Risiko |
|---|---|---|---|
| Ventilstatus | Prüfen Sie, ob alle Ventile in der richtigen Offenstellung bleiben, insbesondere das Auslassabsperrventil. | Vor dem Probelauf alle Ventile ordnungsgemäß öffnen. Schließen Sie nicht das Auslass-Absperrventil. | Ein geschlossenes Auslassventil kann einen hohen Druck verursachen und den Kompressor beschädigen. |
| Betriebsbedingungen des Kondensators | Für wassergekühlte Systeme, Überprüfen Sie, ob das Kühlwasserventil geöffnet bleibt. Für luftgekühlte Systeme, Überprüfen Sie, ob der Lüfter läuft und ob die Luftstromrichtung korrekt ist. | Der Kühlwasserdurchfluss oder die Luftmenge müssen den Geräteanforderungen entsprechen. | Eine schlechte Wärmeabführung kann den Kondensationsdruck erhöhen und die Kühlleistung verringern. |
| Elektrische Steuerung | Testen Sie den elektrischen Steuerkreis separat. Überprüfen Sie, ob die Versorgungsspannung normal bleibt. | Der Steuerkreis sollte ordnungsgemäß funktionieren. Die Spannung sollte stabil bleiben und den Anforderungen des Geräts entsprechen. | Spannungsprobleme oder Steuerungsfehler können den Start verhindern oder einen falschen Schutz auslösen. |
| Kompressorölstand | Überprüfen Sie den Ölstand im Kurbelgehäuse des Kompressors. | Halten Sie den Ölstand in der Nähe der Mittellinie des Schauglases. | Ein niedriger Ölstand kann zu schlechter Schmierung führen und die Lebensdauer des Kompressors verkürzen. |
| Hoch- und Niederdruckmessgeräte | Überprüfen Sie, ob die Druckwerte auf der Hochdruck- und Niederdruckseite im normalen Betriebsbereich bleiben. | Die Druckwerte sollten den normalen Betriebsbedingungen des Geräts entsprechen. | Ein abnormaler Druck kann auf eine Verstopfung hinweisen, niedrige Kältemittelfüllung, Überladung, oder schlechte Wärmeableitung. |
| Öldruck | Überprüfen Sie, ob der Öldruckwert normal bleibt. | Für Kompressoren mit Leistungsregelung, Der Öldruck sollte 0,15–0,3 MPa über dem Saugdruck liegen. Für Kompressoren ohne Leistungsregelung, Der Öldruck sollte 0,05–0,15 MPa über dem Saugdruck liegen. | Ein niedriger Öldruck kann zu Schmierungsfehlern führen und das Risiko eines Kompressorausfalls erhöhen. |
| Betrieb des Expansionsventils | Achten Sie auf den Kältemittelfluss durch das Expansionsventil und prüfen Sie den Leitungszustand. | Sie sollten einen normalen Fluss hören. In Kühlraumsystemen, Die Linie sollte eine normale Glasur aufweisen. | Fehlende Strömungsgeräusche oder ungewöhnliche Eisbildung können auf eine Verstopfung hinweisen, schlechte Flüssigkeitsversorgung, oder Ventilausfall. |
| Kompressor mit Leistungsregelung | Für Kompressoren mit Entladevorrichtung, Überprüfen Sie, ob der Kompressor bei Volllast startet. | Der Kompressor sollte bei der Erstinbetriebnahme mit Volllast laufen. Überprüfen Sie die Zylinderkopftemperatur, um den Betrieb zu bestätigen. | Wenn einige Zylinder nicht funktionieren, Die Kühlleistung kann sinken. |
| Zylinderkopftemperatur | Berühren Sie jeden Zylinderkopf und vergleichen Sie die Temperatur. | Ein heißerer Zylinderkopf bedeutet normalerweise, dass der Zylinder normal funktioniert. Ein kühlerer Zylinderkopf kann bedeuten, dass der Zylinder nicht funktioniert. | Ein nicht arbeitender Zylinder kann zu einer geringen Leistung oder einem instabilen Betrieb führen. |
| Sicherheitsschutzvorrichtungen | Überprüfen Sie das Hoch- und Niederdruckrelais, Öldifferenzdruckrelais, Kühlwasser-Abschaltrelais, Frostschutzgerät, Sicherheitsventil, und andere Schutzgeräte nacheinander. | Alle Schutzgeräte sollten normal funktionieren und die richtigen Einstellungen verwenden. | Ein Schutzversagen kann das Risiko eines Systemunfalls erhöhen. |
| Instrumentenablesungen | Überprüfen Sie, ob die Messwerte anderer Instrumente innerhalb des angegebenen Bereichs bleiben. | Alle Messwerte sollten ohne offensichtliche Schwankungen stabil bleiben. | Abnormale Messwerte können auf versteckte Systemprobleme hinweisen. |
| Umgang mit ungewöhnlichen Zuständen | Achten Sie auf ungewöhnliche Geräusche, Druck, Temperatur, oder andere ungewöhnliche Bedingungen während des Testlaufs. | Stoppen Sie zuerst das Gerät, Dann finde die Ursache. | Bei fortgesetztem Betrieb kann sich das Problem verschlimmern. |
| Allgemeine Fehlerprüfung | Konzentrieren Sie sich auf häufige Fehler wie die Blockierung des Expansionsventils und des Filtertrockners. | Wenn das System instabil läuft, Überprüfen Sie zunächst diese häufigen Fehlerpunkte. | Eine Verstopfung kann zu einer schlechten Flüssigkeitszufuhr führen, abnormaler Druck, und schwache Kühlung. |
| Sauberkeit und Trockenheit des Systems | Stellen Sie sicher, dass das System im Inneren sauber und trocken bleibt, ohne Schmutz oder Feuchtigkeit. | Halten Sie das System vor der Installation und Inbetriebnahme sauber und trocken. | Schmutz und Feuchtigkeit können zu Eisblockaden führen, Schmutzblockade, und schlechte Schmierung. |
Notiz: Wenn Sie ungewöhnlich hohen Druck feststellen, niedriger Öldruck, ungewöhnliches Geräusch, oder häufige Sicherheitsfahrten, Stoppen Sie das Gerät sofort und überprüfen Sie das System. Zwingen Sie es nicht, weiterzulaufen.
Häufige Probleme mit Kühlraumgeräten
Während des Kühlraumgerätebetriebs, Häufige Probleme können Hochdruckalarme sein, Niederdruckstörungen, Probleme mit dem Öldruck, Fehler beim Starten des Kompressors, und Vereisung des Expansionsventils.
Eine vollständige Anleitung zur Fehlerbehebung finden Sie hier, Bitte lesen Sie unseren ausführlichen Beitrag „Liste der Kühlraumfehler und der ultimative Leitfaden zur Fehlerbehebung“.
R404A Ersatztrend
R404A dient noch immer vielen bestehenden Kühlraumsystemen, Aber es sticht nicht mehr als langfristige Wahl für neue Projekte hervor.
Sein hoher GWP erhöht den Compliance-Druck, Engeres Versorgungsrisiko, und weniger vorhersehbare Wartungskosten.
Für Großhändler, Installateure, EPC-Auftragnehmer, und Endverbraucher, Die Wahl des Kältemittels beeinflusst mittlerweile nicht nur das Systemdesign, sondern auch die Betriebskosten und die langfristige Markttauglichkeit.
Markttrend
Immer mehr Kühlraumprojekte reduzieren ihre Abhängigkeit von R404A. Bei Neuinstallationen, Käufer bevorzugen zunehmend Kältemittel mit niedrigerem GWP, die langfristig einen besseren Wert bieten.
Dies bedeutet, dass bei einem neuen Projekt heute noch R404A verwendet wird, Der Vorabkauf scheint möglicherweise einfacher zu sein, aber zukünftiges Nachfüllen von Kältemittel, Service, und die Compliance-Kosten können steigen.
Hauptaustauschrichtung
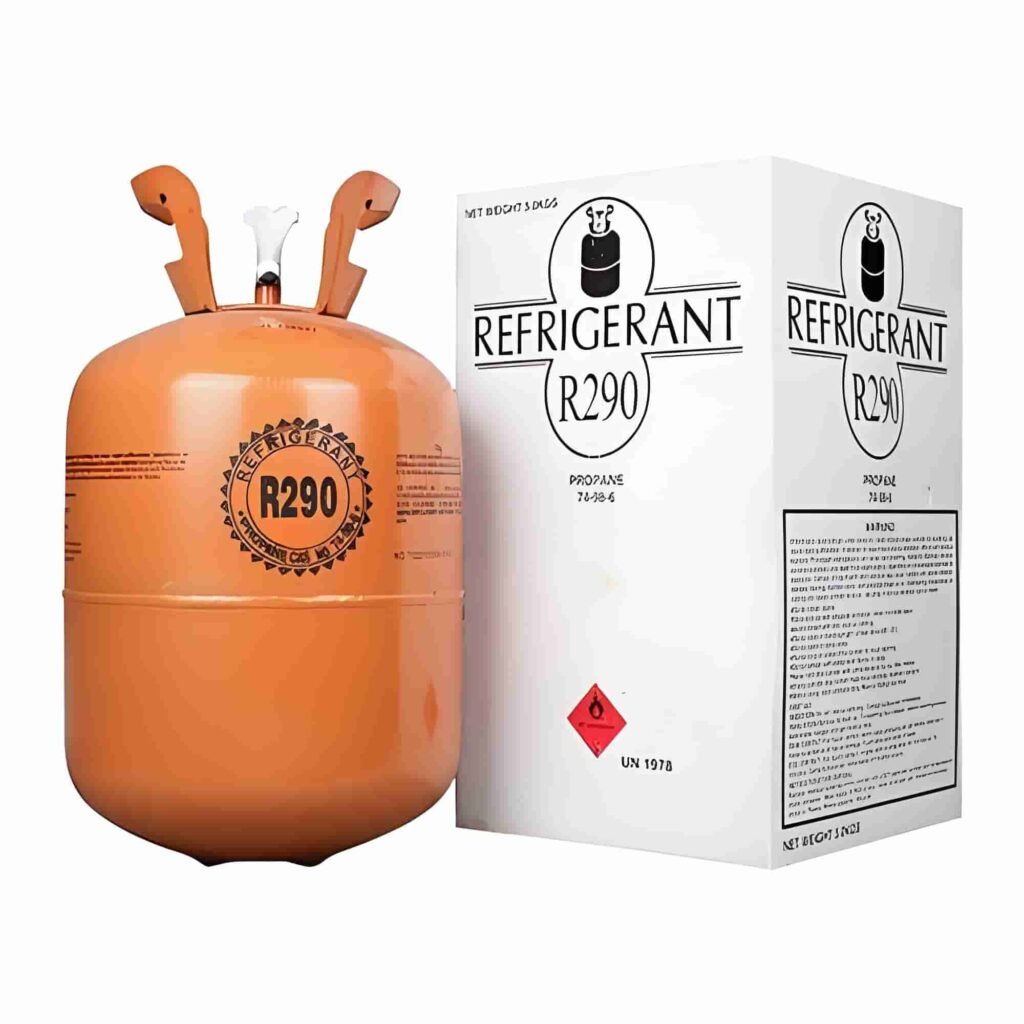
Aus dem heutigen Markttrend, R290 verdient als Ersatzoption mehr Aufmerksamkeit.
Im Vergleich zu R404A, R290 bietet ein extrem niedriges Treibhauspotenzial und größere Vorteile bei der Einhaltung von Umweltvorschriften und der langfristigen Entwicklung.
Für Lieferanten und Auftragnehmer, die die Wettbewerbsfähigkeit ihrer Produkte verbessern möchten, zukünftige politische Risiken reduzieren, und den Projektwert stärken, R290 erfreut sich immer größerer Beliebtheit.
Jedoch, R290 erfordert mehr als einen einfachen Kältemittelwechsel. Es erfordert höhere Standards im Systemdesign, Sicherheitsregeln, Anwendungsplanung, sowie Installations- und Servicefähigkeit.
Deswegen, Eine ausgereifte R290-Kühlraumgerätelösung zeigt nun die technische Stärke und Upgradefähigkeit eines Herstellers.
Kommerzielle Auswirkungen
Aus betriebswirtschaftlicher Sicht, Der R404A-Austauschtrend wirkt sich direkt auf die Konfiguration neuer Projekte aus, Produktpositionierung, After-Sales-Strategie, und langfristige Marktwettbewerbsfähigkeit.
When customers choose a cold room Verflüssigungseinheit, Sie konzentrieren sich nicht mehr nur auf den Stückpreis.
Sie berücksichtigen auch, ob das Kältemittel zu zukünftigen Markttrends passt, ob der Service komfortabel bleibt, und ob das Projekt seinen Wert in den kommenden Jahren behalten kann.
FAQs
Q1: Wie kaufe ich Kühlraum-Kondensationsgeräte von einem chinesischen Hersteller??
1. Bestätigen Sie die Raumtemperatur, Raumgröße, Kältemittel, Stromversorgung, und Umgebungstemperatur zuerst.
2. Wenn Sie OEM-Service benötigen, Logo bestätigen, Karton, Typenschild, Handbücher, und Controller-Sprache frühzeitig.
3. Fragen Sie nach MOQ, Vorlaufzeit, Ersatzteile, und After-Sales-Support vor der Bestellung.
4. Vor dem Versand, Überprüfen Sie die Marke des Kompressors, Typenschilddaten, Kältemittel, Rohrgrößen, elektrischer Aufbau, und Schaltplan.
5. Für mehr Sicherheit, Bestätigen Sie zuerst die Spezifikationen, Dokumente zweitens, Inspektionsstandard dritter, und die Restzahlung zuletzt.
Q2: Worauf sollte ich achten, wenn ich ein Kondensationsgerät für unterschiedliche Klimazonen oder Regionen auswähle??
1. Für heiße Regionen, Prüfen Sie, ob das Gerät hohe Umgebungstemperaturen wie 46°C verträgt, 50°C, oder 52°C.
2. Achten Sie auf die Größe des Kondensators, Lüfterleistung, Kompressor-Match, und Kit-Optionen für hohe Umgebungstemperaturen.
3. Für Küsten- oder Feuchtgebiete, Korrosionsschutz prüfen, Schrankmaterial, und Elektrokastenversiegelung.
4. Für staubige Bereiche, Überprüfen Sie das Luftstromdesign und den Reinigungskomfort.
5. Ein Gerät, das an das lokale Klima angepasst ist, läuft normalerweise zuverlässiger und hält länger.
Q3: Worauf sollte ich besonders achten, wenn ich die Kondensationseinheit im Freien installiere??
Erste, Überprüfen Sie die Belüftung. Dann prüfen Sie den Sonnenschutz, Regenschutz, und Serviceraum.
Wenn sich die Luft im Kondensator nicht gut bewegen kann, Das Gerät ist möglicherweise immer noch einem hohen Kondensationsdruck ausgesetzt, geringere Kühlleistung, und häufige Sommeralarme, selbst wenn die Konfiguration korrekt ist.

Q4: Will unstable voltage affect Verflüssigungseinheit Betrieb?
Ja, und die Auswirkungen können größer sein, als viele Käufer erwarten.
Spannungsschwankungen können den Kompressorstart beeinträchtigen, Aktion des Schützes, Lüfterbetrieb, und Stabilität des Kontrollsystems. In schwerwiegenden Fällen, Dies kann auch zu falschen Sicherheitsauslösungen führen oder die Lebensdauer elektrischer Teile verkürzen.
Wenn Ihre örtliche Stromversorgung instabil ist, Überprüfen Sie vor dem Kauf die Spannung und den Frequenzbereich des Geräts.
Sie sollten auch prüfen, ob Sie eine Spannungsstabilisierung benötigen, Phasenfolgeschutz, Phasenausfallschutz, oder eine übergeordnete elektrische Steuerung.
Q5: Was übersehen Käufer am häufigsten, wenn sie das Gerät nach dem Kauf vor Ort inspizieren??
Viele Käufer prüfen lediglich, ob die Außenseite beschädigt aussieht, Aber kleine Details verursachen später oft größere Probleme.
Wenn die Einheit ankommt, Überprüfen Sie nicht nur das Aussehen. Überprüfen Sie auch die Typenschilddaten, Marke und Modell des Kompressors, Kältemitteltyp, Rohranschlussgrößen, Lüftermenge, Spezifikation des Netzteils, Konfiguration des Steuerkastens, und ob der Lieferung der Schaltplan und die Kabelmarkierungen beiliegen.
Abschluss
Die Kühlraum-Kondensationseinheit beeinträchtigt die Kühlleistung, Energieverbrauch, und Systemzuverlässigkeit.
Die richtige Einheit kann einen stabilen Betrieb unterstützen, geringere Betriebskosten, und weniger Serviceprobleme.
Wenn Sie die Schlüsselkomponenten verstehen, Auswahlpunkte, Installationsgrundlagen, und häufige Probleme, Sie können bessere Entscheidungen für Ihr Kühlraumprojekt treffen.


2 Kommentare
Die Literatur ist so erstaunlich, es tut so gut daraus zu lernen.
Aber ich schlage vor, Sie hätten den Installationsplan und den Schaltplan beifügen können.
OK, danke für den Vorschlag.