熱膨張バルブ機能
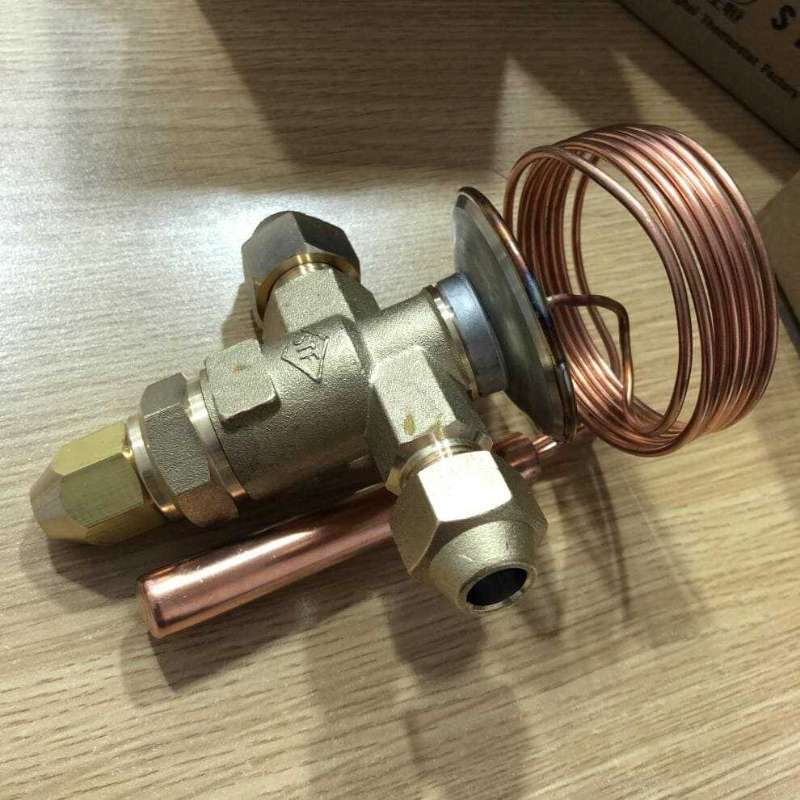
温度式膨張弁 (ショートと呼ばれます “TXV” ) 冷蔵サイクルの1つの基本システムコンポーネントです. 彼の機能は次のとおりです:
1. スロットルと圧力の低減
凝縮器内の凝縮後の通常の温度と高圧液液冷媒の圧力をスロットルして低下させる, 蒸発器を流れる冷媒を調整します, 蒸発器の出口の過熱を制御します. 過熱=エアアウトレット温度 – 蒸発温度.
2. フローを調整します
温度センサーによって得られた温度信号に応じて, TXVは、蒸発器に入る冷媒の流れを自動的に調整して、冷蔵負荷の変化を適応させることができます.
3. 異常な過熱を防ぎます
拡張バルブは流量を調整して蒸発器に一定の過熱を維持させます, 蒸発器の効果的な使用を確認します, その間、液体を避けてください 冷媒 コンプレッサーに入って液体ストライクを引き起こします; 同時に, 異常な過熱を防ぐことができます.
TXVの分類とインストール
TXVは2つのタイプに分割できます: 内部バランスと外部バランス.
内部バランスの取れたTXV
温度センサーの圧力=スプリング圧力 + 蒸発器の吸気圧力. バルブダイアフラム圧力は、蒸発器の入口からのものです.
外部バランスの取れたTXV
温度センサーの圧力=スプリング圧力 + 蒸発器の出口圧力. バルブダイアフラム圧力は、蒸発器の出口からのものです, 大きな蒸発器抵抗を備えたシステムで常に使用されています.
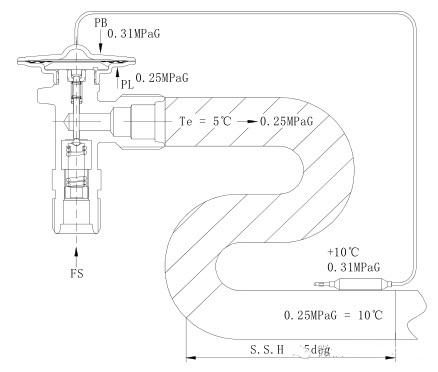
TXV 構造
蒸発器アウトレットの水平エアアウトレットパイプに温度センサーを取り付けます, 1.5mコンプレッサー吸引ポートから離れています. 温度センサーは、蓄積された液体でパイプラインに配置してはなりません. そしてパイプにしっかりと巻き付けます, その間、金属の自然な色を露出させるために、接触部分の酸化スケールをきれいにします。.
エア出口パイプ径<25mmの場合, 温度センサーはパイプの上部に取り付けることができます; 直径>25mmの場合, 空気出口パイプの下側で 45° で結ぶことができ、パイプ底部の油の蓄積が温度センサーの性能に適切な影響を与えるのを防ぎます。.
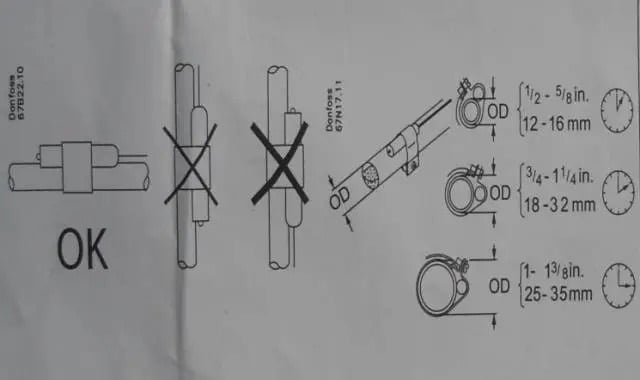
温度センサーの設置
TXVデバッグ
通常の状態で TXV をデバッグする必要がある 冷凍 動作状態. 流量が多すぎる場合, デバッグネジを時計回りに半回転回します. さもないと, デバッグネジを反時計回りに回します, それも半回転. デバッグネジは一度に半回転以上回さないでください.
以上の間隔が必要です 15 各デバッグ間の分.
Txvの過熱は5〜8℃でなければなりません. そうでない場合, それを調整します.
TXVデバッグの例
故障: 一定の温度と湿度 エアコン 両方のコンプレッサーで実行されています, エアアウトレットは22.5℃です, エアインレットは16.8℃です, その冷却性能は良くありません. フレオンは十分でした, フィルターがブロックされていません.
検査: 2 コンプレッサー’ エアアウトレットが過熱し、膨張バルブアウトレットの温度が低かった. 蒸発器の出口温度は18°でした, エアアウトレット圧力は3.2kg/cm2でした (対応する温度は-5℃でした, 過熱は23℃でした), これは明らかに通常の過熱から逸脱していました. 理由は、拡張バルブが十分に開いていなかったためです.
デバッグ: 正しいデバッグの後, 蒸発器の出口温度は12°でした, エアアウトレット圧力は4.8kg/cm2でした, 対応する温度は4.5個でした, そして、過熱は7.5℃でした.
オンサイトのデバッグの前後の特定のデータは次のとおりです:
| アイテム | 蒸発器の出口温度 (℃) | コンプレッサーエアアウトレット圧力 (kg/cm2) | コンプレッサーエアアウトレット圧力のためのラレーション温度(℃) | オーバーヒート(℃) | 過熱リクエストを満たすかどうか |
|---|---|---|---|---|---|
| メーカーのデバッグ標準値 | <14 | 4.5~6 | 2.5~11 | 5~8 | はい |
| (#1 コンプレッサー) デバッグの前 | 21.0 | 3.2 | -5.0 | 26.0 | いいえ |
| (#1 コンプレッサー) デバッグ後 | 12.3 | 5.0 | 5.8 | 7.6 | はい |
| (#2 コンプレッサー) デバッグの前 | 20.5 | 4.0 | 0.0 | 20.5 | いいえ |
| (#2 コンプレッサー) デバッグ後 | 13.9 | 5.2 | 6.0 | 7.9 | はい |
このデバッグで, 最適な過熱は、それぞれ7.6℃と7.9°でした.
| アイテム | エアコンエアアウトレット | エアコンエアアウトレット | 空調エアインレット | 空調エアインレット | 空気入口と出口の間の温度ギャップ |
|---|---|---|---|---|---|
| ユニット | 温度 (℃) | 湿度 (%) | 温度 (℃) | 湿度 (%) | (℃) |
| デバッグの前 | 22.5 | 54.8 | 16.8 | 75.4 | 5.7 |
| デバッグ後 | 22.5 | 54.8 | 14.3 | 84.3 | 8.2 |
結論
やっと, 熱膨張バルブ (TXV) 冷媒の流れを調節し、最適なシステムパフォーマンスを確保する上で重要な役割を果たします.
その機能を理解することにより, 分類, 適切なインストール, デバッグテクニック, 効率的な操作を維持し、潜在的な問題に効果的に対処できます, の信頼性に貢献しています 冷凍 また 空調 システム.
コメント?
ようこそメッセージを残すか、再投稿してください.


